The capital letters are a great deal of fun. We also use the clothes line for them, and you will see that they go above the clothes line and below it, and the clothes line marks their middle. You can make them bigger than this, but do not make them smaller!
The Capital A
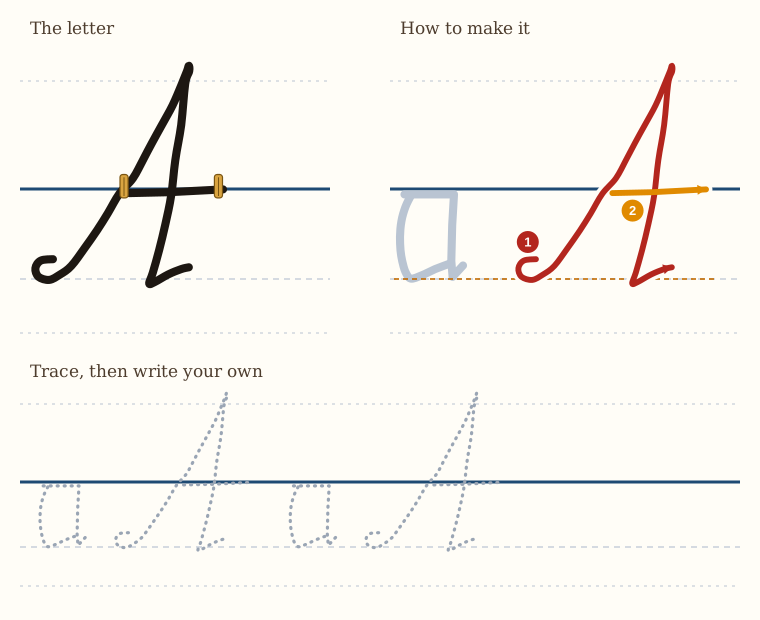
The letter A for the capital starts at the base of where the small a would be. We make a little curve, and then we go up on a slope, quite high, and then we come down, and then make a little swiggle, like a little tick thing going forwards.
And then the cross line is on the clothesline.
And that can just be a straight line, or we can give it a little curve if we want to.
The Capital B
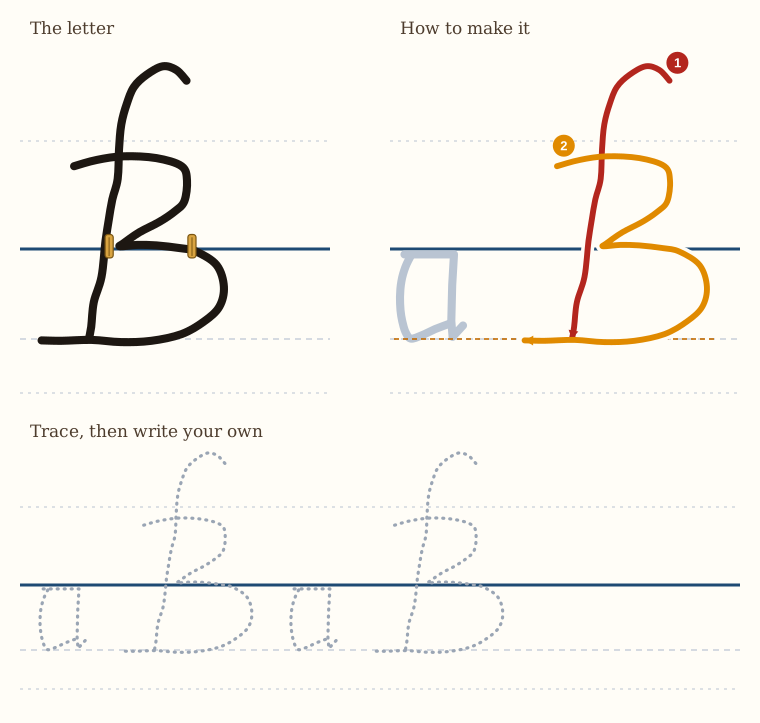
The letter B is formed from this really long l. It's much taller than a normal l.
So it curves at the top, and then it comes down and stops at the bottom of where the a would be.
And then we pick up our pen, and we make this big number three. And the middle of the number three is on the clothesline. And the bottom of the three has got a bigger belly than the top. So: small head, big belly. And it goes and it touches the bottom of that vertical line, and then shoots behind it a little bit.
And that's our capital B.
You can curve it up slightly if you want to after that, or just leave it straight.
The Capital C
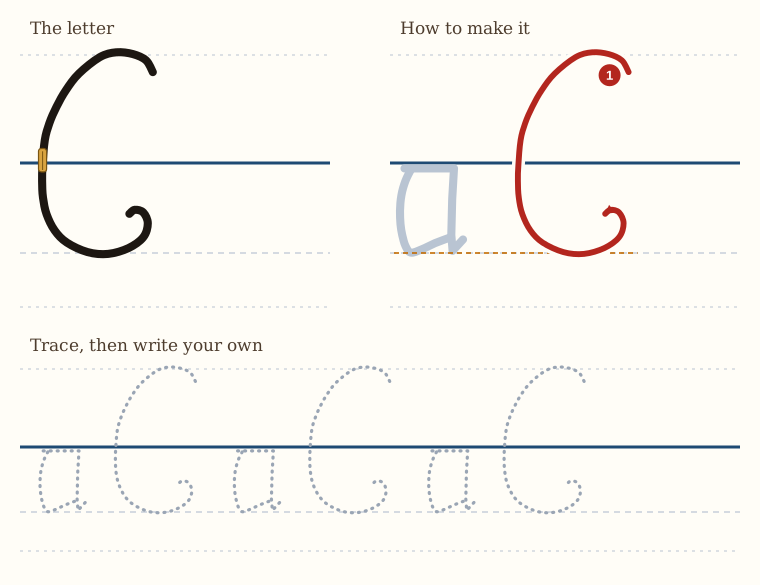
Here is our capital C, and it's just a really big c.
So we start up above the line, quite far above the line, and then we give it a nice big curve, and then we come round underneath and curl it in.
And that's all. So it's just a really big c.
The Capital D
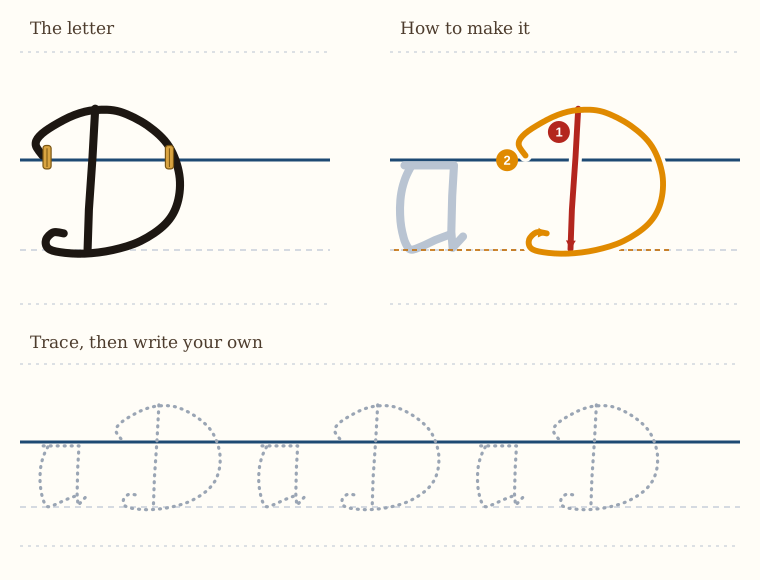
Here's letter D. It's quite straightforward.
So we draw a line. It starts above the clothesline and it goes below, stopping at the depth of the bottom of the a.
Then we pick up our pen and we make this backwards c, like you're drawing a c in a mirror. And it goes, touches the top of the vertical line, and it goes to the front, quite a big belly. Give it a big fat belly like Father Christmas. And then it comes round and under the bottom, and a little curve.
That's it. A nice big fat D.
The Capital E
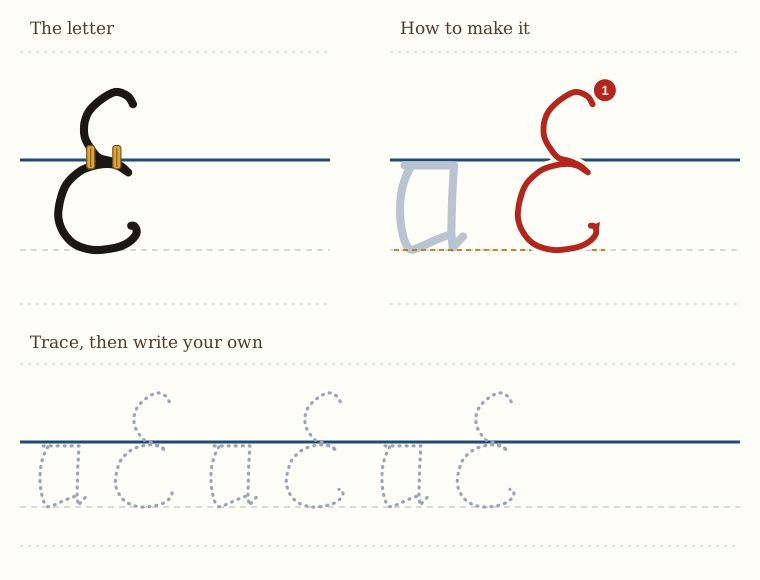
And here's a capital E. It's like the number 3, but looked at in the mirror. The top part is a bit smaller than the bottom. So once again: smaller head, bigger body. The middle is on the clothesline.
So it's very simple. We curl it in, we go to the clothesline, and then we make another.
So it's like one c, and then underneath it another c, and it curls a little bit at the bottom.
The Capital F
The letter F looks like it's a backwards F, but that's how we do it in this handwriting.
So we go above the clothesline, we make a little curly thing, a little like, I suppose, this little tilde thing on your keyboard. You know, you've got this little wavy line on the keyboard: you make one of those. And then you come down, a slightly wavy line, and then like a j at the bottom, give it a nice curl,
and then we cross it on the clothesline.
The Capital G
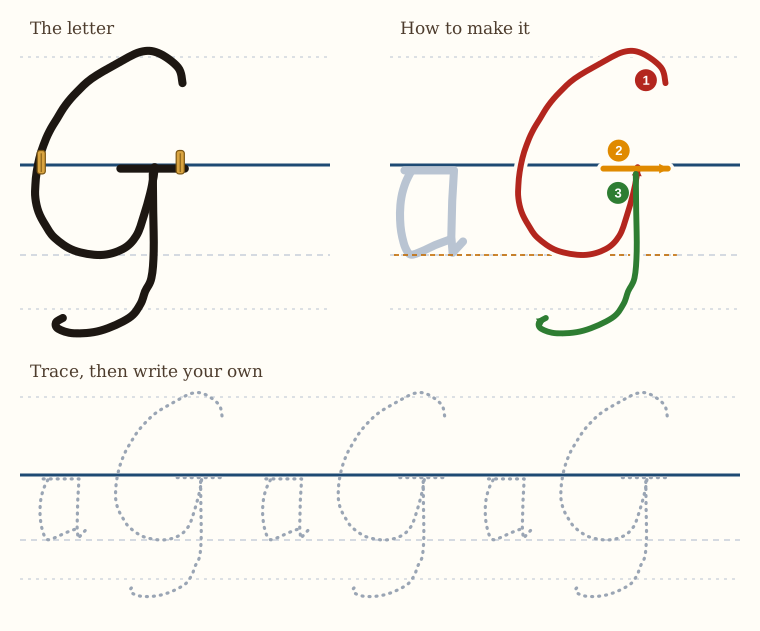
All right, here's the letter G. And once again, we are familiar with this. It's a great big c, except that the top of the c is like hanging over a little bit at the top.
So we make this big c, and then the bottom of the c curls around and touches the clothesline.
And then we pick up our pen, we cross it,
and then we have to pick up our pen again. And then we make a j underneath the c.
And that gives us our capital G.
The Capital H
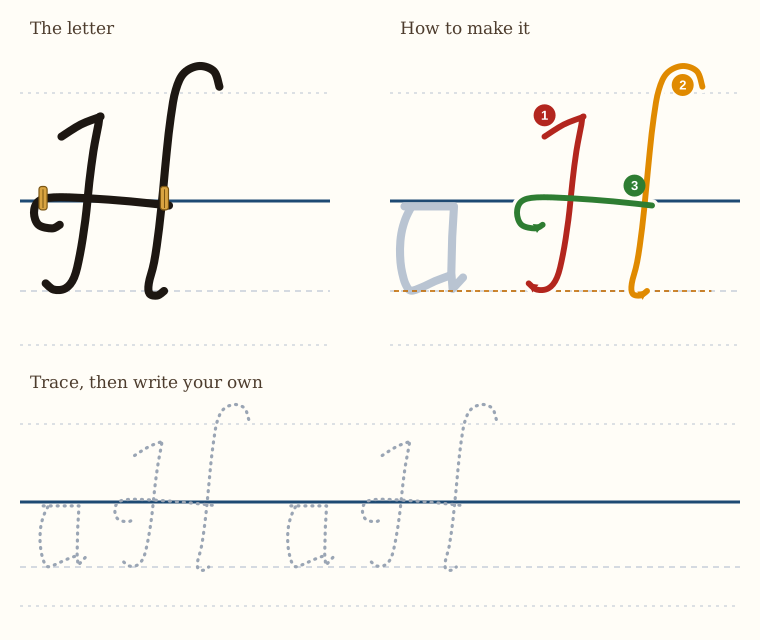
The letter H: we have to make three strokes.
Firstly, we start above the clothesline, we tick up, and we come down straight, and then we curve in slightly, facing backwards.
Then we pick up our pen, we move forward a little bit, and we go up higher than the first stroke. We curl round, come down straight, and tick away in the other direction.
Then we pick up our pen, and we make this little walking stick shape that is along the clothesline, and that joins the two together.
And there we have our capital H.
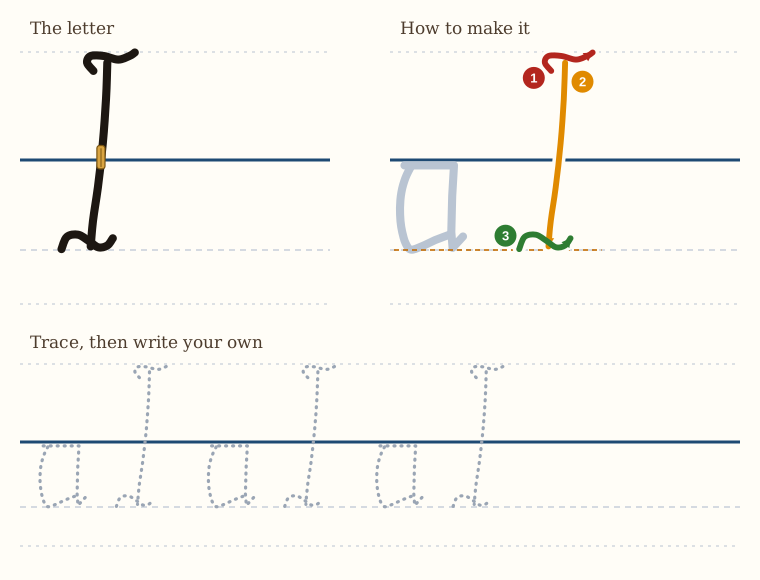
The Capital I
The letter I is very straightforward.
We make a little squiggle, quite above the clothesline,
straight down,
and then a little squiggle underneath.
And that is capital I.
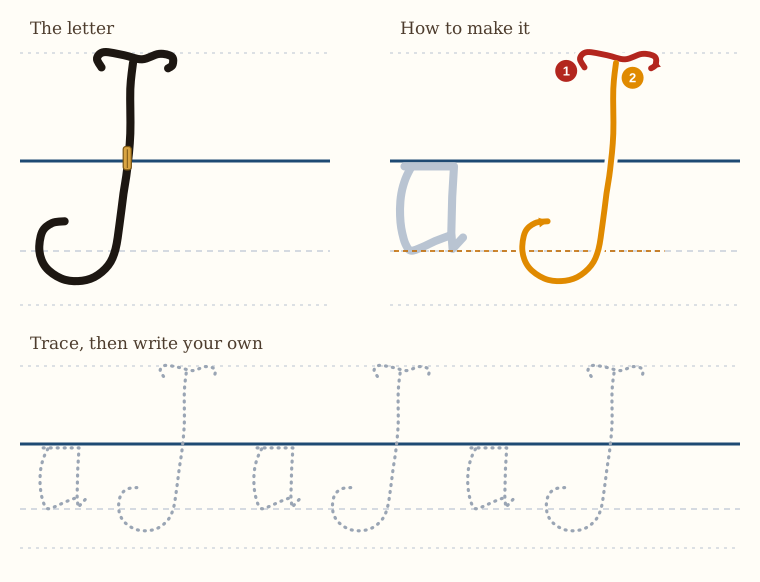
The Capital J
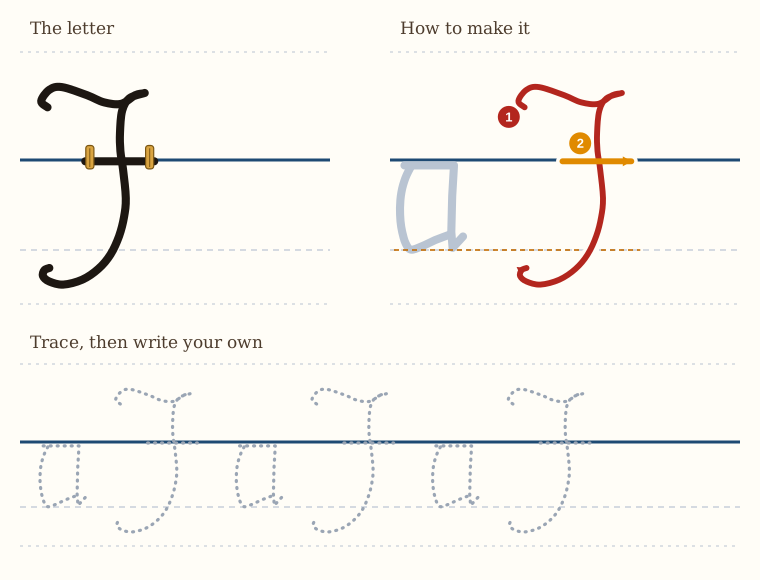
J is formed from two pen strokes.
We have a squiggle on the top.
We start off, of course, quite high above the clothesline. We come down straight, and then give it a nice, good curve at the bottom.
And that is our letter J.
The squiggle can be a little bit longer or a little bit shorter. It's up to you.
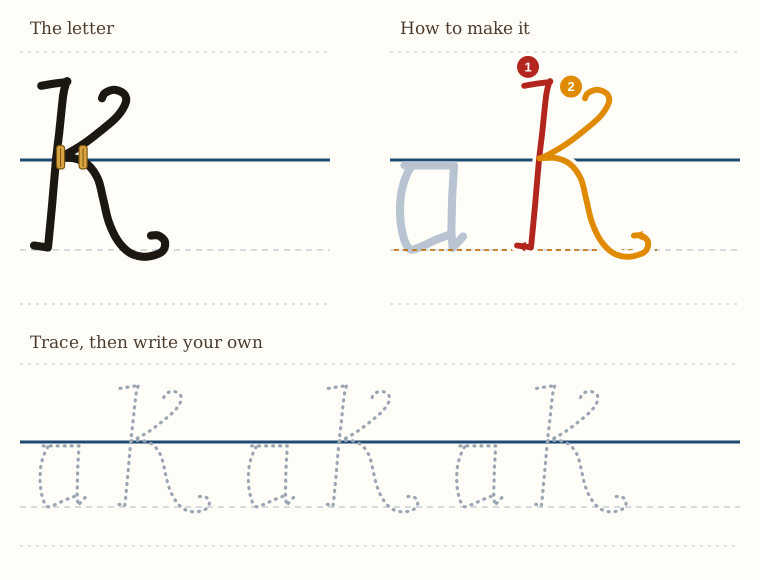
The Capital K
The letter K is formed from two strokes.
Firstly, we make a small tick, and then we come down straight, and then a tiny line at the bottom of that straight line, if you want to.
Then pick up our pen, and it's like you're going to make a capital R, but you're not. So you make a little curvy thing, and you come down straight, you touch the line at the clothesline, and then you make this nice S-shaped curve going forwards.
That S-shaped curve going forwards can be a bit longer, but it mustn't be shorter than what it is there. And it's the same depth as the letter a.
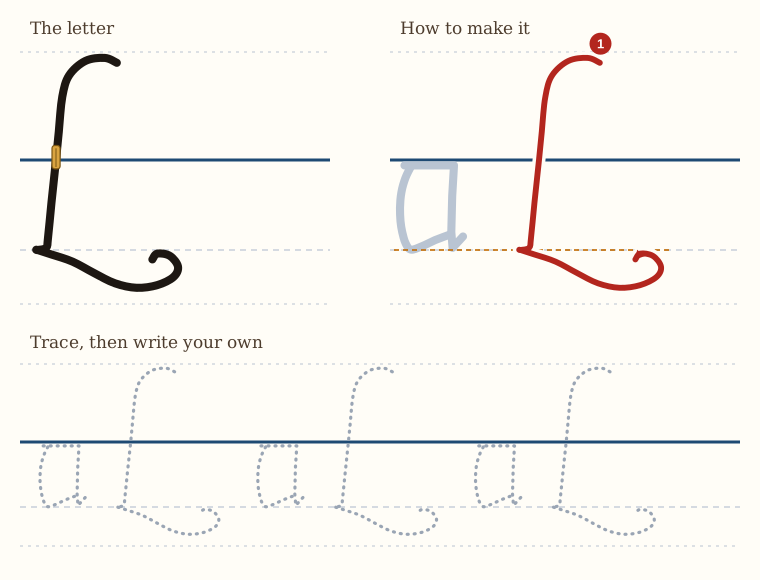
The Capital L
The letter L you are familiar with from the pound sign, which is used for British money.
And this letter, we start off with a curved line above the clothesline, and it comes down straight, and then it goes backwards a tiny bit, and then it curls and drops as it curls. And it actually drops down below the level of the a, and then it curls back on itself with a little scroll shape.
And that's the letter L, capital L.
The Capital M
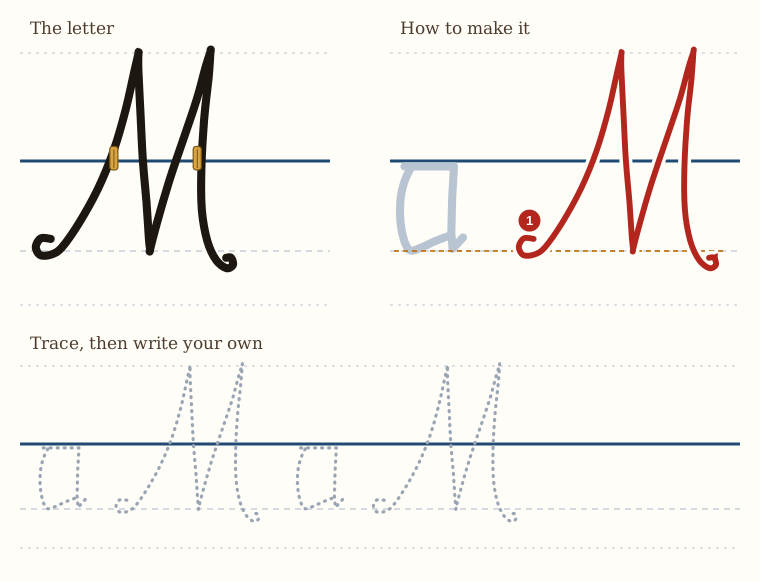
Right, here's the letter M, and this is quite a fun letter.
So we start off at the level of the bottom of the a, we make a little hook, and we go up pretty much straight, and then we come down with a slight curve to it, we go up straight again, and then we come down with a slight curve to it, like a little walking stick shape, and then we give it a little hook on the bottom.
And that's our capital M, which looks a bit like an upside down W, but it ain't. It's an M.
The Capital N
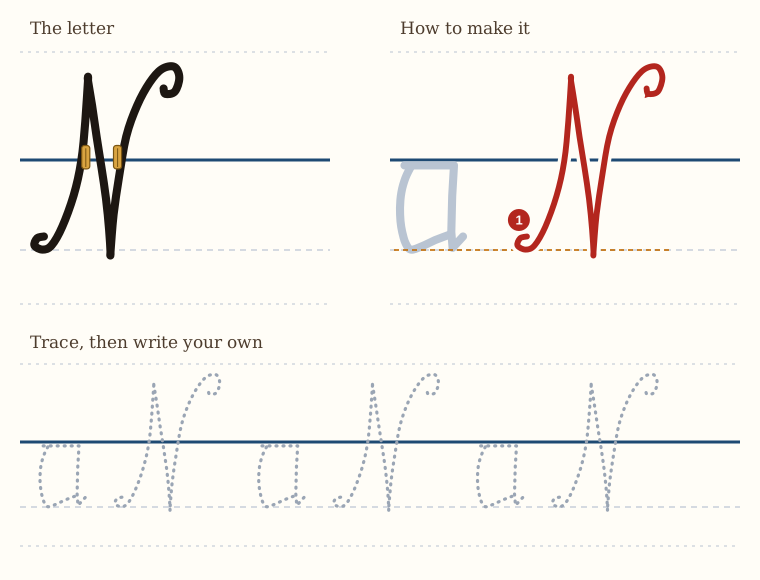
The letter N starts at the base of where the bottom of the baby a is.
Little curly thing, and we go up, and then we come down straight on an angle, and then we go up, leaning slightly forwards, and we give it a nice curl at the top.
And that curl at the top, it's up to you how high you go and how much of a curl you give it.
The Capital O
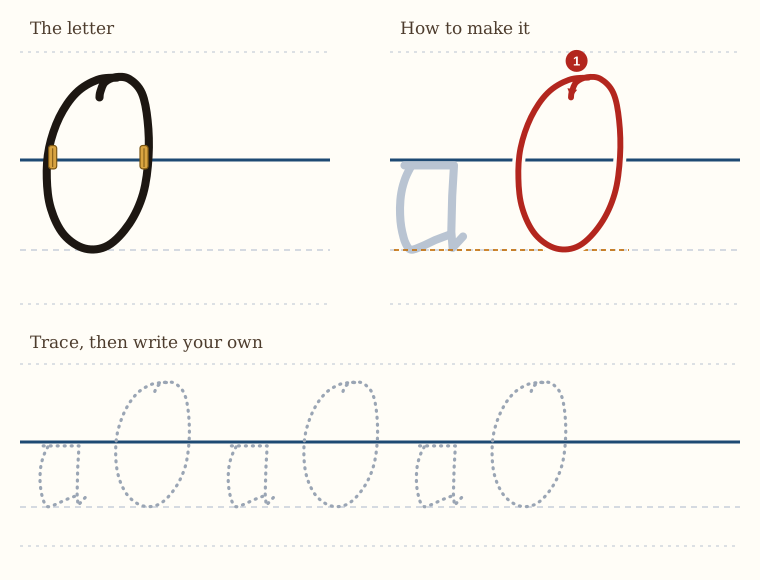
Right, here's the capital O. It's a big oval shape, and it's actually quite hard to do.
It's just a big circle, really. And at the top, it tucks itself in a little bit.
You can make it more rounded, you can make it more oval. It does take quite a lot of practice to make a nice capital O, because it's quite a big letter. And that's all there is to know about it.
It needs a bit of practice to get it right and to make it look pretty. Practice makes perfect.
The Capital P
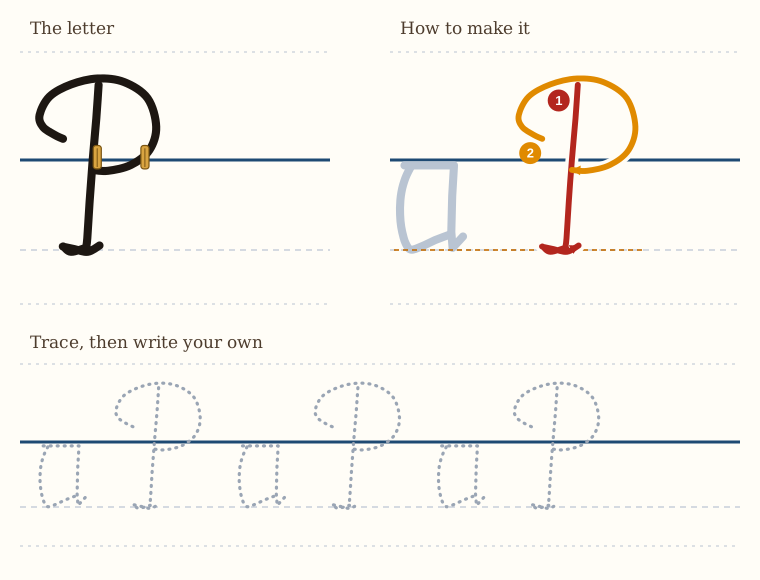
The letter P is made with two strokes.
The first is the downstroke. So we start above the clothesline, depending how big you want your P to be, and we come down, and then at the bottom we do this little leg, little twiddly thing.
Then you pick up your pen, and we start behind the P, and we curl around and up, touch the top of the line, and then make a nice fat D shape with a belly, like Father Christmas once again.
Don't starve your P. Give it a nice round belly.
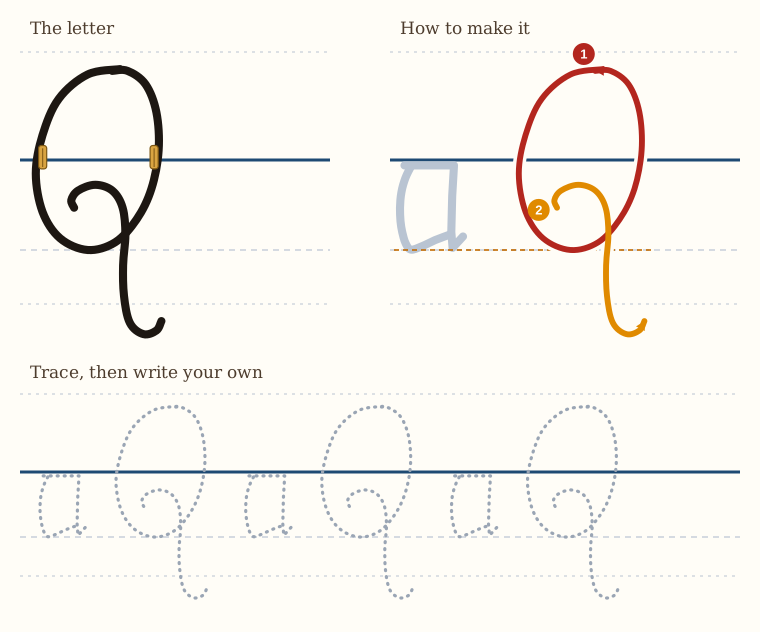
The Capital Q
The letter Q is formed of two strokes.
We start at the top, just like with the letter O, and we make this oval shape, a nice big oval.
And then we pick up our pen, and we make this sideways s shape through the middle of the Q, crossing over and coming down.
And that's it. It's a simple letter to make, and it looks quite nice.
This piece that crosses down, you can give it a flourish to make the curl bigger if you want to.
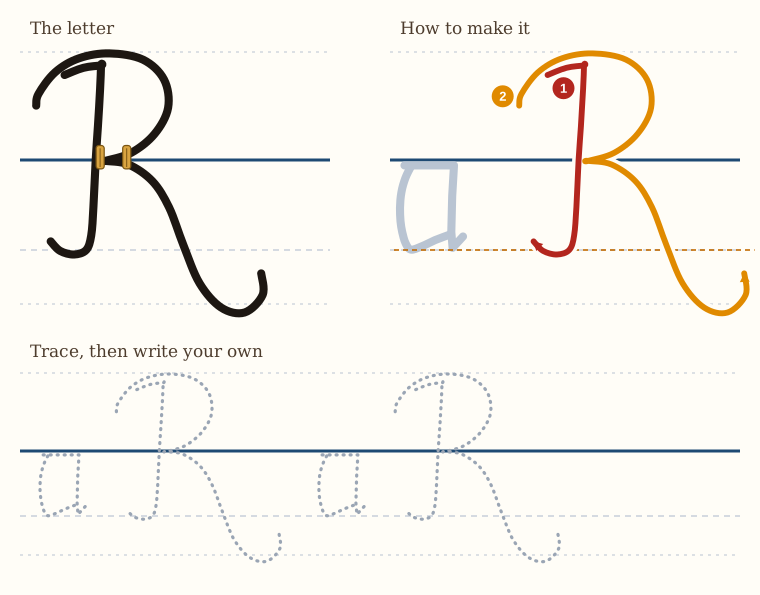
The Capital R
The letter R is formed of two shapes.
Firstly, we have the upright: so a small little tick, and we come down straight, and then we curl backwards. That curl backwards is at the level of the bottom of the baby a.
Then we pick up our pen, and we start behind that line, and we come around, and we give it a head, and we touch the vertical line on the clothesline. And then we give it its leg pointing forwards, an s shape coming down, and that drops down below the level of the a, with a nice curve on the end.
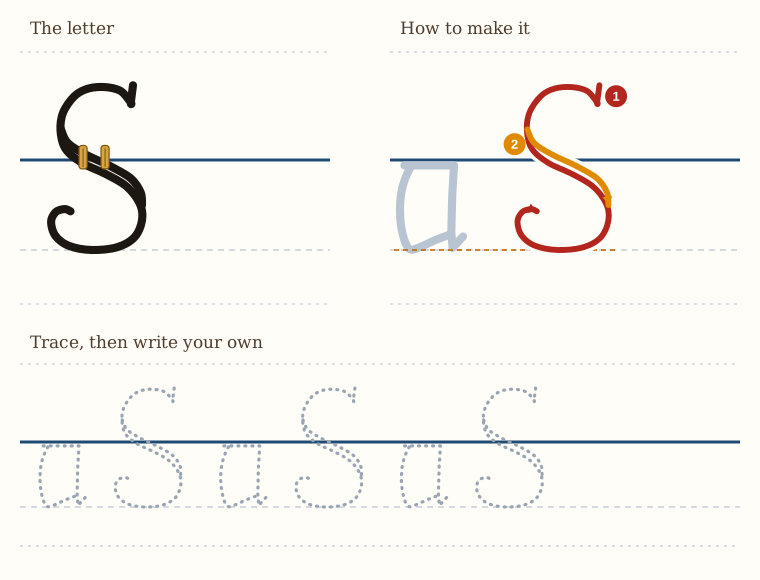
The Capital S
The capital letter S is just a very big s.
So we make a little tick down, and then we make an s. The bottom has got a bigger belly than the top, and then we curl around.
Then what you do is this: because a single-line S of this size looks a bit too thin, we pick up our pen, and we make a double thickness in the central part of the S, just like I have in this drawing.
And that gives the centre of the S some weight, and so it doesn't look like it's going to blow away in the wind.
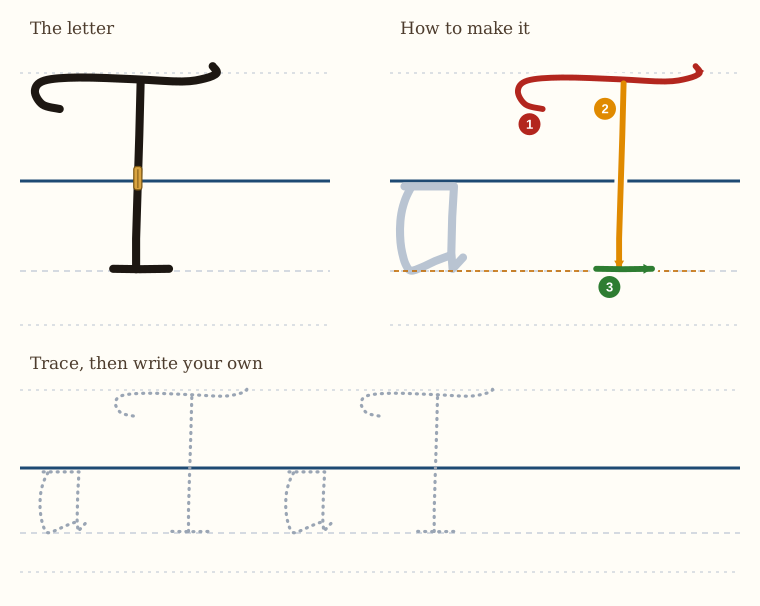
The Capital T
The letter T is pretty much like a capital T that you find in a book.
So we make a little walking stick shape. We go across, straight across horizontally, and then a little curve upwards.
And then we draw straight down,
and then we cross it on the bottom.
And that's our capital T.
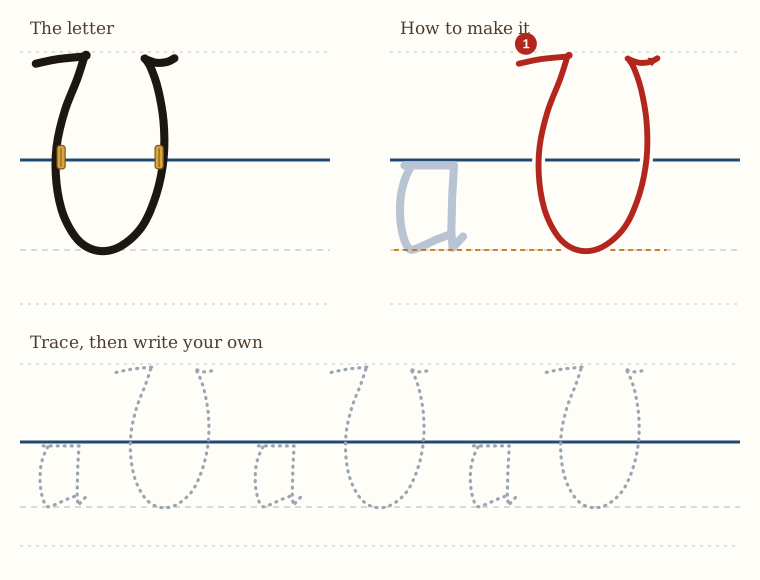
The Capital U
The letter U is just like a very big u.
With a line going into it at the top, and then we curve it a bit and back up again, and then a line going out, away, at the top.
So it's got a slightly closed-in feeling towards the top of it. Otherwise, it's like a regular u, just very big.
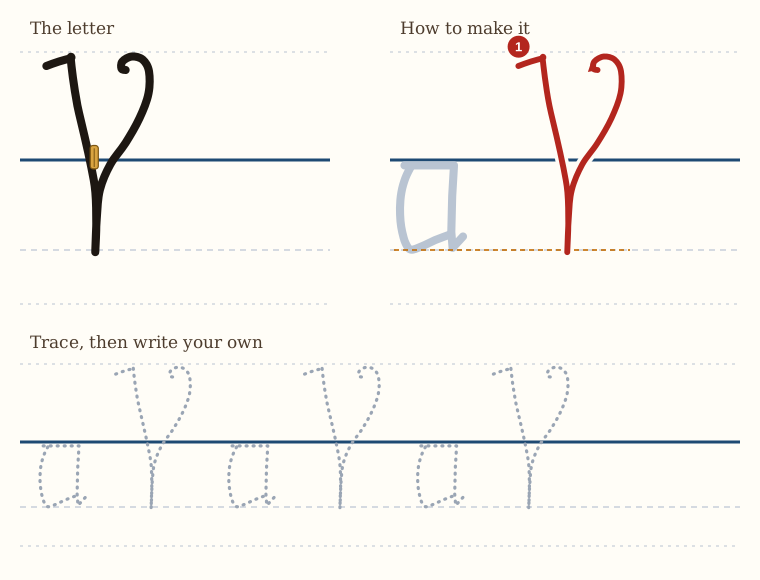
The Capital V
The letter V is like a very big v, but slightly more pretty.
So we have a little tick. We come down, not quite straight: give it a little curve. And then we go down to the depth of the bottom of the a. And then we curve up nicely and curl around.
It's quite a pretty letter to draw.
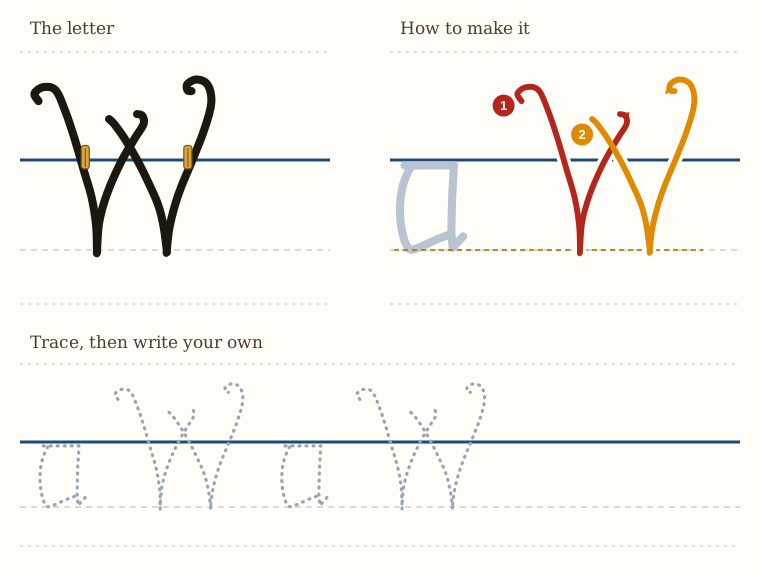
The Capital W
Right, here's our capital W.
We start off quite far above the clothesline with a little curl. We come down straight, and then up with a little bit of a curl, just like we did with the V.
Then we cross over that: we pick up our pen and we start again. We come down with a little curved line to the same depth as the other one. And then we curl up and away, just like we did with the V in the previous letter.
And that's our W.
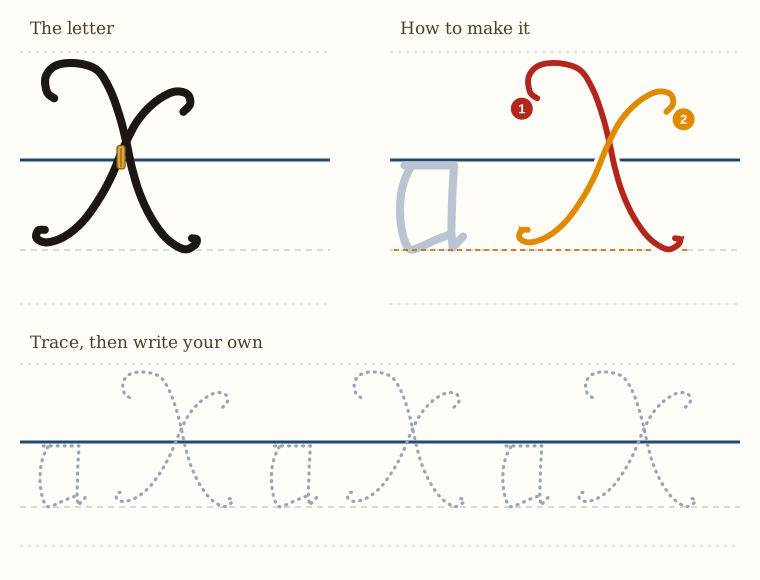
The Capital X
Letter X. It's like a walking stick on its side, a double walking stick: a walking stick with two handles, one on each end.
We start off, firstly, with the curved line. So we make the handle, we come down, and then we give it a little handle on the other end.
And then we cross over: pick our pen up, and make a double-headed walking stick in the other direction.
These walking sticks are not dead straight. They've got a nice curve to them. So the X is quite a graceful letter.
And you can vary the length of one of the crossbars if you want. That's up to you. Longer, not shorter.
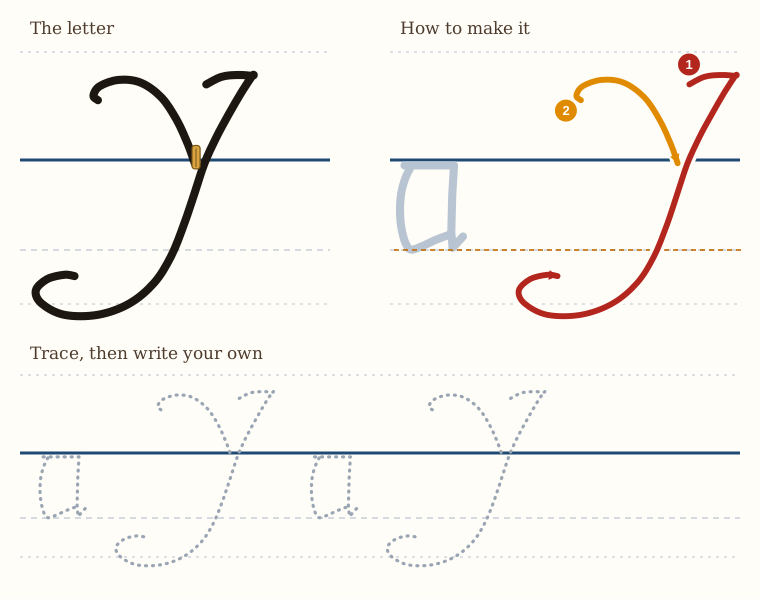
The Capital Y
The letter Y is formed from a special kind of a J that's got a lean to it.
So we start off above the clothesline, we go across to the right, and then we make our J. But our J is not straight down, it's leaning on its side; and give it a nice loop on the bottom.
Then we pick up our pen, and we make a curved line coming in, and it hits that J on the clothesline.
And that gives us our letter Y.
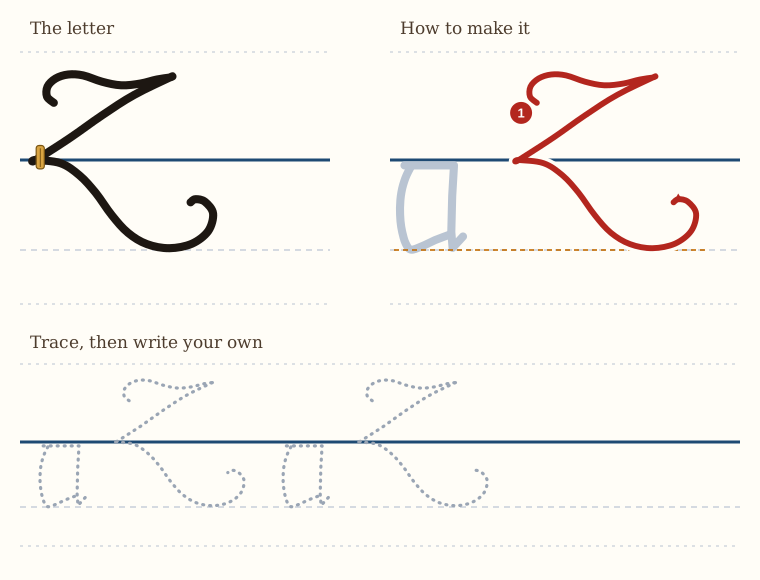
The Capital Z
And now we have the capital Z, Z-E-E or Z-E-D, depending on how you pronounce it. This is an interesting letter. It's not formed quite how you expect.
So we start off above the line. We make a little curve going across from the left to the right, and then straight down till we hit the clothesline. And then we give it this tail, but the tail is sloping downwards with a loop.
That tail can slope down below the level of the a, or level with it, depending how you want and how much room you've got on the page.
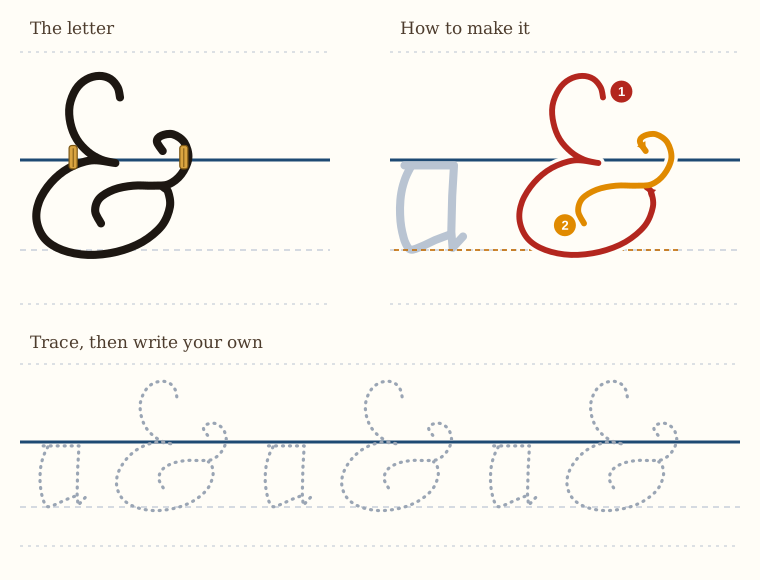
The Ampersand
This final letter is not actually one letter, it's two letters. It's an E and a T. And of course, E and T spell the word et, which is the Latin word for and, Latin being the language spoken by the ancient Romans. And so what people did was they made what's called a ligature. You combine the two letters together, the E and the T, and you can see them there. The head of the T is the second stroke, and the E is the E.
So how do you form this?
Well, you make a big capital E like we did before, and then you bring it around almost to the clothesline.
Lift up your pen, and then you make the squiggle across, which is the top of the capital T.
And that is an ampersand, as we call it in English, or the Latin word et, which means and.